Dive into the World of Snorkeling Photography
Want to capture stunning underwater photos on your next snorkeling adventure? This listicle delivers seven essential tips to elevate your underwater photography game. Learn how to use natural light, compose breathtaking shots, and master techniques like split shots and macro photography. Whether you're snorkeling off a catamaran in Punta Cana or exploring reefs from a party boat, these tips will help you create unforgettable images of your underwater explorations. Improve your photos and preserve the memories of your Bavaro ocean tour. Remember to prioritize safety and follow your tour guide's instructions.
1. The Rule of Thirds for Underwater Composition
The Rule of Thirds is a fundamental photography technique that can dramatically improve your snorkeling photos. It's a compositional guideline that divides your camera's frame into nine equal sections using two horizontal and two vertical lines, like a tic-tac-toe board. Instead of placing your subject dead center, the Rule of Thirds suggests positioning key elements along these lines or, even better, at the points where they intersect. This creates more balanced, visually interesting, and natural-looking images. It allows you to showcase not only the subject itself but also the beauty of the surrounding underwater environment.
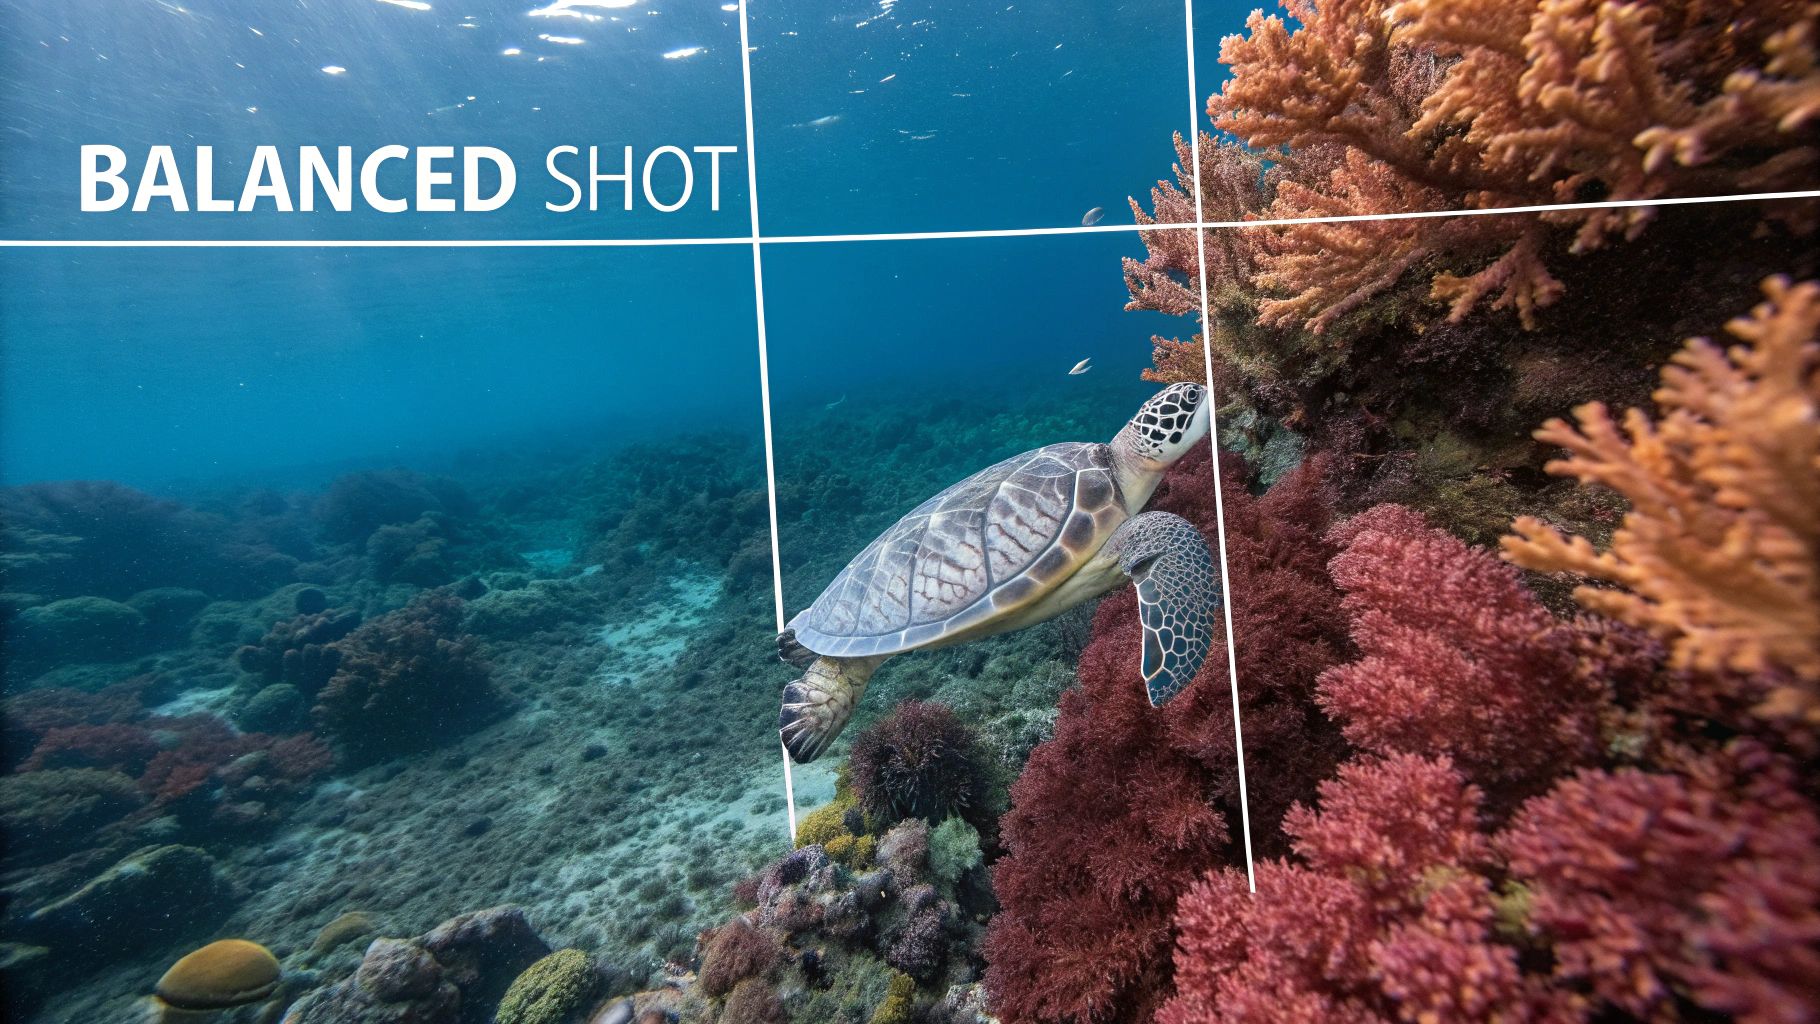
This technique is particularly effective for capturing the vibrant reefs and diverse marine life you'll encounter on snorkeling tours in locations like Punta Cana, Bavaro, or during a catamaran excursion. Imagine you're snorkeling in the crystal-clear waters off a Malibu party boat or a Punta Cana party boat, and you spot a stunning coral formation. Instead of centering it in your frame, try positioning it along the right vertical third line, allowing the beautiful blue water to fill the left two-thirds. This not only highlights the coral but also conveys the sense of vastness and wonder of the underwater world. Similarly, if you encounter a sea turtle during your ocean tour, aim to position it at one of the intersection points as it gracefully swims by.
Tips for Applying the Rule of Thirds While Snorkeling:
- Enable Gridlines: Most underwater cameras and even smartphones have the option to display gridlines on the screen. Activating this feature makes visualizing the Rule of Thirds much easier while composing your shots.
- Horizon Placement: When capturing split shots—half underwater, half above—avoid placing the horizon line directly in the middle. Instead, align it with either the upper or lower horizontal third line for a more dynamic composition. This works particularly well on boat tours where you have a clear view of the sky and the underwater world simultaneously.
- Focus on the Eyes: If you're taking close-ups of marine creatures, try placing their eyes at one of the intersection points. This creates a strong focal point and a more engaging connection with the subject.
- Use Negative Space: Don't be afraid to leave empty space in your composition. The “negative space” surrounding your subject can actually enhance the image by providing context and showcasing the beauty of the underwater environment.
Pros and Cons:
- Pros: Creates dynamic and professional-looking images, easy to learn and implement, works well for both wide-angle and close-up shots.
- Cons: Can feel formulaic if overused, challenging to apply with fast-moving subjects, occasionally breaking the rule can lead to more impactful images.
This technique deserves a place on this list because it's a simple yet powerful way to elevate your snorkeling photography from snapshots to stunning underwater imagery. Whether you're a beginner or an experienced photographer, using the Rule of Thirds can significantly enhance the quality and visual appeal of your photos, making your snorkeling adventures even more memorable. It allows you to capture the magic of the underwater world in a way that truly captivates your audience, whether they are fellow party boat revelers or friends back home. It's a skill easily implemented even with basic equipment, enhancing your memories from those Punta Cana tours and catamaran excursions. This technique has been popularized by renowned underwater photographers like David Doubilet and is frequently employed by National Geographic and Instagram influencers specializing in underwater travel photography, proving its effectiveness in creating compelling visuals.
2. Mastering Natural Light for Shallow Water Photography
Snorkeling offers a fantastic opportunity to capture the vibrant beauty of the underwater world, and harnessing natural light is key to achieving stunning results. Unlike deeper dives requiring artificial light sources, snorkeling takes place in shallow, sun-drenched waters where natural light is abundant. This technique focuses on understanding how sunlight interacts with the water, creating those iconic blue hues, shimmering light rays, and caustic patterns, and how to properly expose your images using this available light. This results in vibrant, naturally-lit underwater photos that truly capture the magic of the shallows.
This technique deserves a spot on this list because it's the most accessible form of underwater photography for snorkelers, especially those enjoying excursions like party boat tours in Punta Cana, Bavaro, Malibu, or on catamaran snorkeling tours. You don’t need expensive equipment to capture amazing underwater shots – just your waterproof camera and an understanding of how to work with the available sunlight.
Utilizing the sun as your primary light source means taking advantage of light refraction and the beautiful caustic patterns it creates in shallow water. This also requires an understanding of the optimal times of day for underwater photography to maximize light penetration and minimize the blue color cast that naturally occurs underwater. Imagine capturing the sunbeams streaming through the crystal-clear waters of a Punta Cana coral reef, illuminating colorful fish and vibrant corals – all achieved with natural light. Think of the effortless beauty you can capture on your GoPro during a snorkeling tour, simply by understanding these principles.
Pros:
- No need for expensive underwater strobes or lighting equipment, perfect for casual photographers on a party boat or snorkeling tour.
- Creates natural-looking images with authentic colors.
- Captures those magical sun rays and light patterns you see while snorkeling.
- Less equipment to manage while swimming, allowing you to enjoy the experience more fully.
Cons:
- Highly dependent on weather conditions and water clarity – a cloudy day can significantly impact your results.
- Limited to daytime shooting, ideally within 4 hours of midday for optimal light.
- Colors become increasingly monochromatic blue with depth.
- Backlit subjects can create silhouettes, requiring some compositional adjustments.
Tips for Mastering Natural Light:
- Shoot with the sun at your back: When photographing coral and marine life, having the sun behind you will illuminate your subjects beautifully, revealing their vibrant colors.
- Aim for snorkeling between 10 am and 2 pm: This is when light penetration is strongest, minimizing the blue cast and providing optimal illumination. Perfect for those midday snorkeling breaks during your catamaran tour.
- Slightly underexpose: This will help preserve highlights and prevent your images from appearing washed out, ensuring those vibrant colors pop.
- Use a shallow water color correction filter (usually red or orange): These filters help compensate for the loss of red and orange light underwater, restoring a more natural color balance to your photos.
- Adjust your white balance settings: Most underwater cameras have a white balance setting; the "cloudy" setting often works well in shallow, sunny conditions.
Examples:
- Sunlight streaming through clear water creating light beams in coral gardens – a classic underwater shot easily achieved with natural light.
- Shallow reef photography with vibrant colors illuminated by direct sunlight.
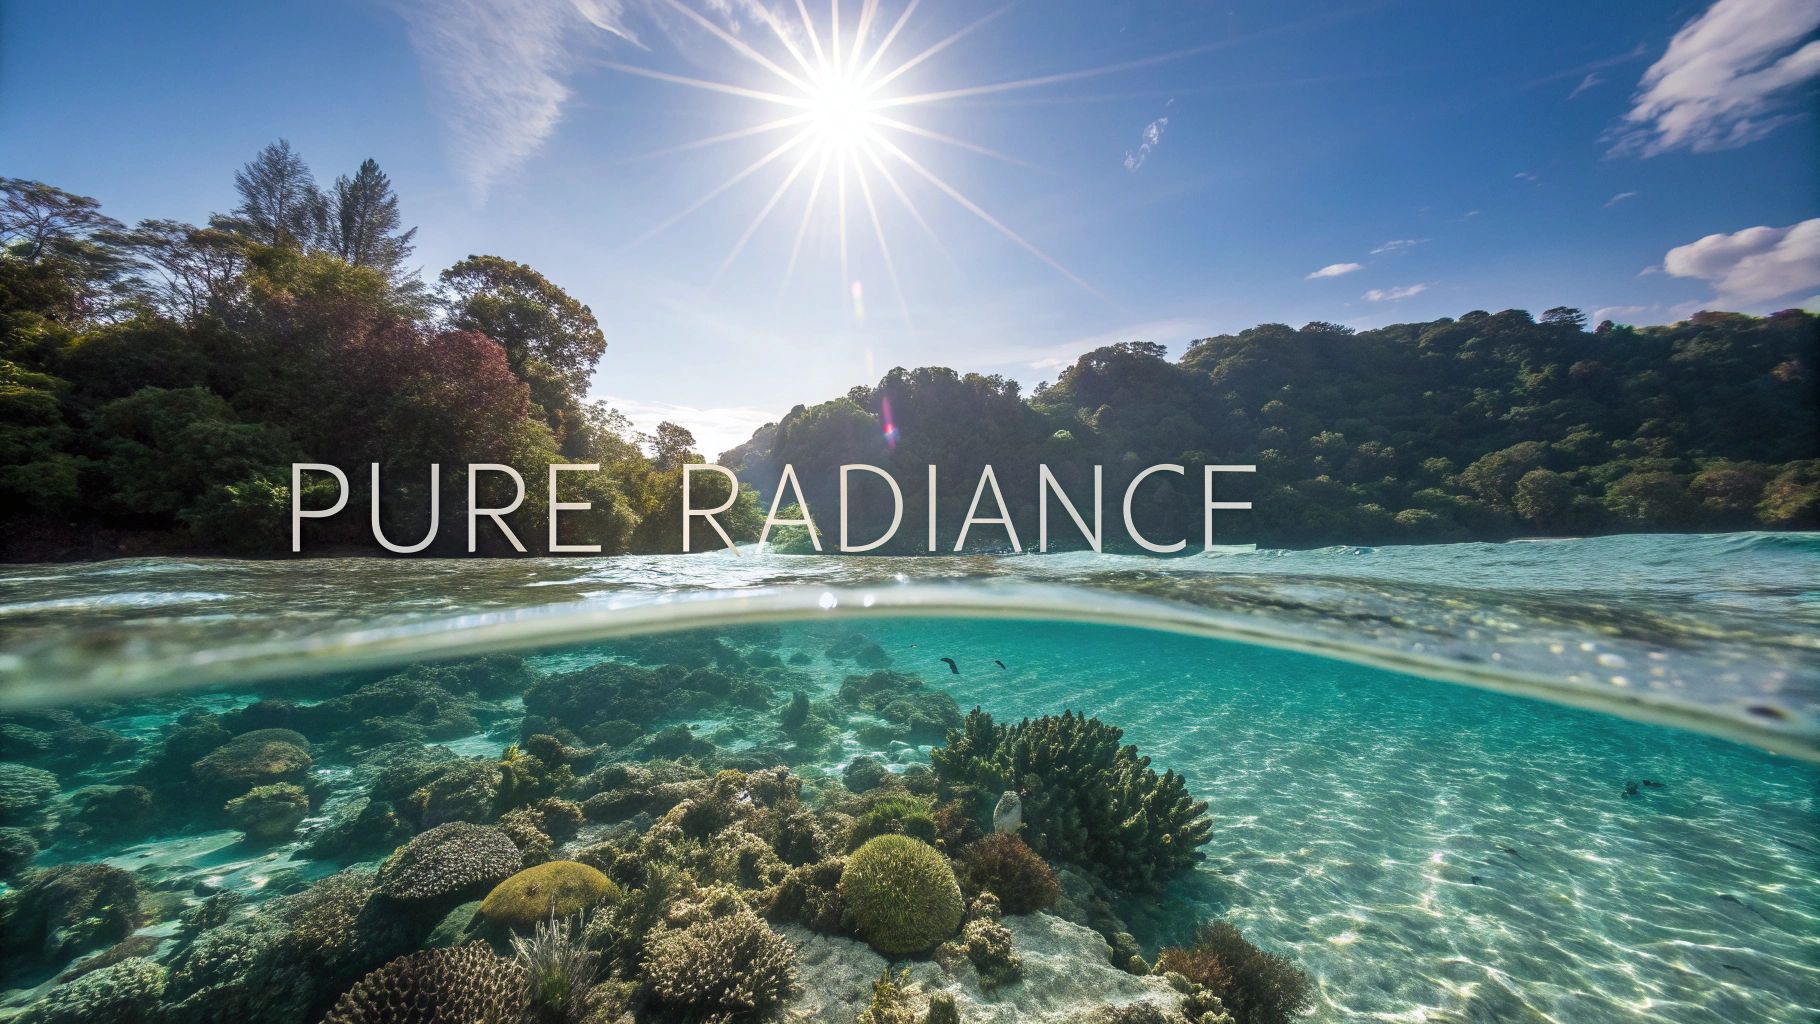
- Split shots using natural light to expose both underwater and above-water elements, a unique perspective you can capture while snorkeling near the surface.
Photographers like Brian Skerry and Elena Kalis showcase the incredible potential of natural light underwater photography. By following these simple tips, you too can capture stunning images on your next snorkeling adventure, whether you're on a party boat in Malibu, exploring the reefs of Punta Cana, or simply enjoying a casual snorkel off the beach.
3. Wide-Angle Split-Shot (Over-Under) Technique
The wide-angle split-shot (also known as over-under or half-and-half) technique in snorkeling photography offers a uniquely captivating perspective, capturing both the above and below-water worlds simultaneously in a single frame. This technique produces dramatic images that tell a complete story of the marine environment and its connection to the surface, making it perfect for showcasing the beauty of destinations like Punta Cana, Bavaro, and other tropical paradises visited on catamaran and party boat tours.
This method works by carefully positioning your camera, encased in a waterproof housing with a dome port, at the waterline. The dome port is crucial as it refracts the light, creating a clean, flat horizon that separates the above and below-water scenes. A wide-angle or fisheye lens is then used to capture the widest possible view, encompassing both realms.
Examples of Successful Implementation:
- Imagine a split shot showcasing the vibrant coral reefs of Punta Cana beneath the turquoise water, with a catamaran full of partygoers enjoying the sun and music above.
- Picture a snorkeler exploring a shipwreck, partially submerged, with the hull visible above the waterline against a stunning Caribbean sunset.
- Envision capturing a school of colorful fish swimming beneath the surface while palm trees sway gently in the breeze above.
Actionable Tips for Stunning Split Shots:
- Dome Port is Key: Invest in at least a 6-inch dome port for the sharpest split line, minimizing distortion.
- Rule of Thirds for the Waterline: Position the water line slightly below the center of the frame (about 1/3 from the bottom) for a balanced composition.
- Aperture for Depth of Field: Set your aperture to f/11 or higher to ensure maximum depth of field, keeping both above and below-water elements in sharp focus.
- Bracket Your Shots: Take multiple shots with slightly different water line positions to ensure you capture the perfect split.
- Master Manual Focus: Use manual focus set to the hyperfocal distance for optimal sharpness throughout the scene.
- Keep it Clean: Apply silicone water repellent to the top portion of the dome to prevent water droplets from obstructing the above-water view.
When and Why to Use This Approach:
This technique is particularly effective in calm, clear water conditions, such as those often found in sheltered bays and coves popular with snorkeling tours. It excels at:
- Creating Visually Striking Images: Split shots are guaranteed to stand out in your portfolio and on social media platforms, capturing the attention of your audience.
- Telling a More Complete Environmental Story: Showcase the interconnectedness of the marine and terrestrial worlds, highlighting the beauty and fragility of these ecosystems.
- Capturing the Essence of Your Snorkeling Adventure: Document your experiences on party boat excursions and catamaran tours in a truly unique and memorable way.
Pros and Cons:
Pros:
- Creates visually striking images that stand out in portfolios.
- Tells a more complete environmental story by showing both worlds.
- Particularly effective for snorkeling in scenic locations.
- Popular on social media and with travel publications.
Cons:
- Requires specialized equipment (dome ports) which can be expensive.
- Technically challenging to execute properly.
- Heavily dependent on calm surface conditions.
- Difficult to properly expose both portions of the image.
Pioneers of Split-Shot Photography:
- David Doubilet
- Jordan Robins
- Aquatech
This technique deserves its place on this list because it elevates snorkeling photography beyond simple underwater snapshots. It offers a creative and impactful way to capture the full experience of exploring beautiful snorkeling destinations, making it a must-try for anyone looking to create stunning and shareable memories of their aquatic adventures. This is especially true for those enjoying the crystal-clear waters of places like Punta Cana and Bavaro on party boats and catamaran tours.
4. Close-Focus Wide-Angle Technique
Close-focus wide-angle (CFWA) photography is a game-changer for underwater snorkeling adventures, allowing you to capture breathtaking images that combine the vastness of the ocean with the intricate details of marine life. This technique involves using a wide-angle lens (typically 16-24mm or fisheye) and getting incredibly close – within inches – of your subject. This proximity minimizes the water column between your lens and the subject, resulting in sharper, more vibrant images with significantly better color and clarity. The background environment remains visible, providing context and showcasing the beauty of the entire underwater scene.
Imagine snorkeling in Punta Cana's crystal-clear waters and capturing a vibrant coral formation filling the foreground, with the reef and shimmering turquoise water stretching out behind. Or picture a close-up of a curious sea turtle just inches from your dome port, sun rays filtering through the water in the background. These are the kinds of stunning images CFWA allows you to create. This technique is particularly effective in clear water environments like those found on snorkeling tours in Punta Cana, Bavaro, and other tropical destinations. It elevates your vacation photos from simple snapshots to captivating, professional-quality images that truly capture the magic of your experience.
Tips for Mastering CFWA While Snorkeling:
- Respect Marine Life: Position yourself carefully to avoid touching or harming any coral or marine life. Maintain a respectful distance, even when getting close for your shot.
- Get Close: Aim to be within 6-12 inches of your foreground subject for maximum impact.
- Aperture Settings: Use apertures between f/8-f/16 to maintain a good depth of field, ensuring both your foreground subject and the background environment are in focus.
- Mini Dome Port: Consider using a mini dome port. These can make close-focusing easier and more manageable, especially while snorkeling.
- Buoyancy and Movement: Practice excellent buoyancy control and move slowly and deliberately to avoid startling your subjects or stirring up sediment. This is crucial for clear shots and respectful interactions with marine life.
Pros and Cons of CFWA:
Pros:
- Improved Clarity and Color: Reduced water column leads to sharper, more vibrant images.
- Dramatic Composition: Creates a sense of depth and immerses the viewer in the scene.
- Contextualized Subjects: Shows marine life within their natural habitat, telling a more complete story.
- Ideal for Clear Water: Perfect for snorkeling excursions in locations like Punta Cana and Bavaro.
Cons:
- Potential for Disturbance: Getting too close can disturb marine life, so careful approach is essential.
- Equipment Requirements: Requires wide-angle lenses and potentially specialized underwater housings.
- Distortion: Can distort foreground subjects, especially at extremely close distances.
- Challenging with Moving Subjects: Requires practice and patience to execute effectively with moving subjects.
CFWA deserves a place on this list because it offers a powerful way to capture truly memorable underwater images. It’s particularly well-suited to the clear, vibrant waters often encountered on snorkeling tours and catamaran excursions. While it requires practice and the right equipment, the stunning results are well worth the effort. Pioneered by underwater photography experts like Alex Mustard and Todd Mintz, and supported by housing manufacturers like Ikelite and Nauticam, CFWA has become a go-to technique for capturing the beauty and wonder of the underwater world. This technique will undoubtedly enhance your snorkeling photography experience, whether you're exploring reefs on a party boat with a DJ or enjoying a tranquil ocean tour.
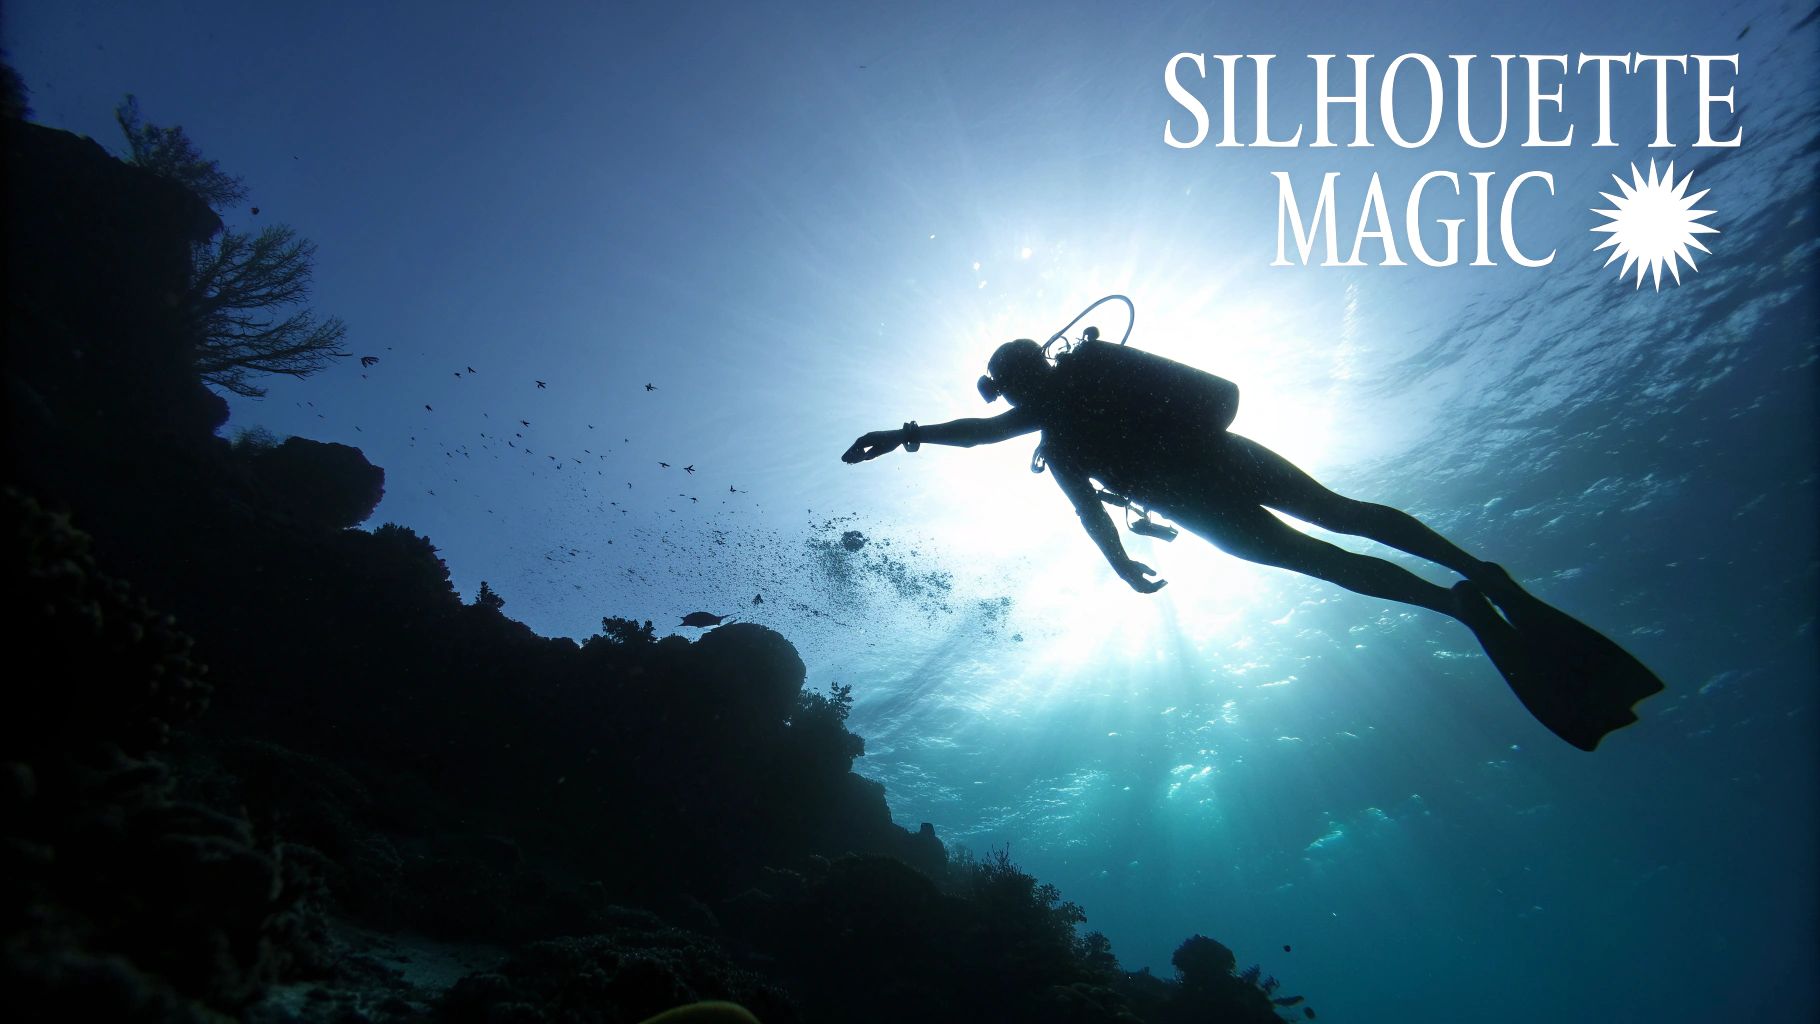
5. Ambient Light Silhouette Photography
Ambient light silhouette photography is a powerful technique that transforms underwater subjects into dramatic dark shapes against the bright background of the sun's rays penetrating the surface. Instead of focusing on color and texture, this method emphasizes form, shape, and movement, creating visually striking images with a distinctly artistic flair. By leveraging the natural backlighting conditions underwater, you can capture bold and graphic photos that highlight the unique silhouettes of marine life, even in less-than-ideal visibility conditions. This technique is especially effective when shooting upwards towards the surface, where the sunlight is most intense.
This technique deserves a place on this list because it offers a readily accessible way to create stunning underwater images, even with basic snorkeling gear and without needing advanced photography skills or expensive equipment. It’s perfect for capturing memorable moments during your party boat, Malibu party boat, Punta Cana party boat, Punta Cana tours, Catamaran Tours, snorkeling tour, or party boat with DJ experience in locations like Punta Cana and Bavaro. Imagine capturing the silhouette of a school of fish against the shimmering Caribbean sun, or the dark, graceful outline of a sea turtle ascending towards the light.
Examples of Successful Implementation:
- A snorkeler’s silhouette against the sun’s rays filtering through the water.
- A school of vibrant tropical fish in silhouette, showcasing their collective movement patterns as they dart and weave.
- The powerful shape of a manta ray darkened against the bright water's surface.
- The outline of a coral formation, highlighting its intricate structure.
Actionable Tips for Snorkelers:
- Positioning is Key: Place yourself below your subject, ensuring the sun is directly behind it. This creates the necessary backlighting for the silhouette effect.
- Expose for the Background: Set your camera or phone to expose for the bright background. This will cause the subject to be underexposed, rendering it as a dark silhouette.
- Focus on Shape: Look for marine life with distinctive shapes that will be easily recognizable even in silhouette.
- Golden Hour Advantage: Shooting during the "golden hour" (sunrise and sunset) provides warmer, more dramatic backlight tones. This adds a magical touch to your silhouette photos.
- Depth Experimentation: Try photographing subjects at different depths. The varying intensity of light at different levels will create unique silhouette effects.
- Capture Motion: Use burst mode (if available) to capture sequences of movement, such as a school of fish swimming or a sea turtle gliding through the water.
Pros and Cons:
Pros:
- Creates dramatic and artistic images with minimal equipment.
- Effective even in waters with lower visibility.
- Captures the distinctive shapes of marine life beautifully.
- Easier to achieve than perfectly exposed underwater shots.
Cons:
- Sacrifices color and texture details.
- Limited primarily to upward shooting angles.
- Requires good sun position and clear surface conditions.
- Can be challenging to expose correctly.
By mastering this simple yet powerful technique, you can elevate your snorkeling photography and capture unforgettable memories of your underwater adventures. Even novice photographers can achieve impressive results with a little practice, making silhouette photography a rewarding and accessible technique for anyone exploring the underwater world on their Caribbean excursions.
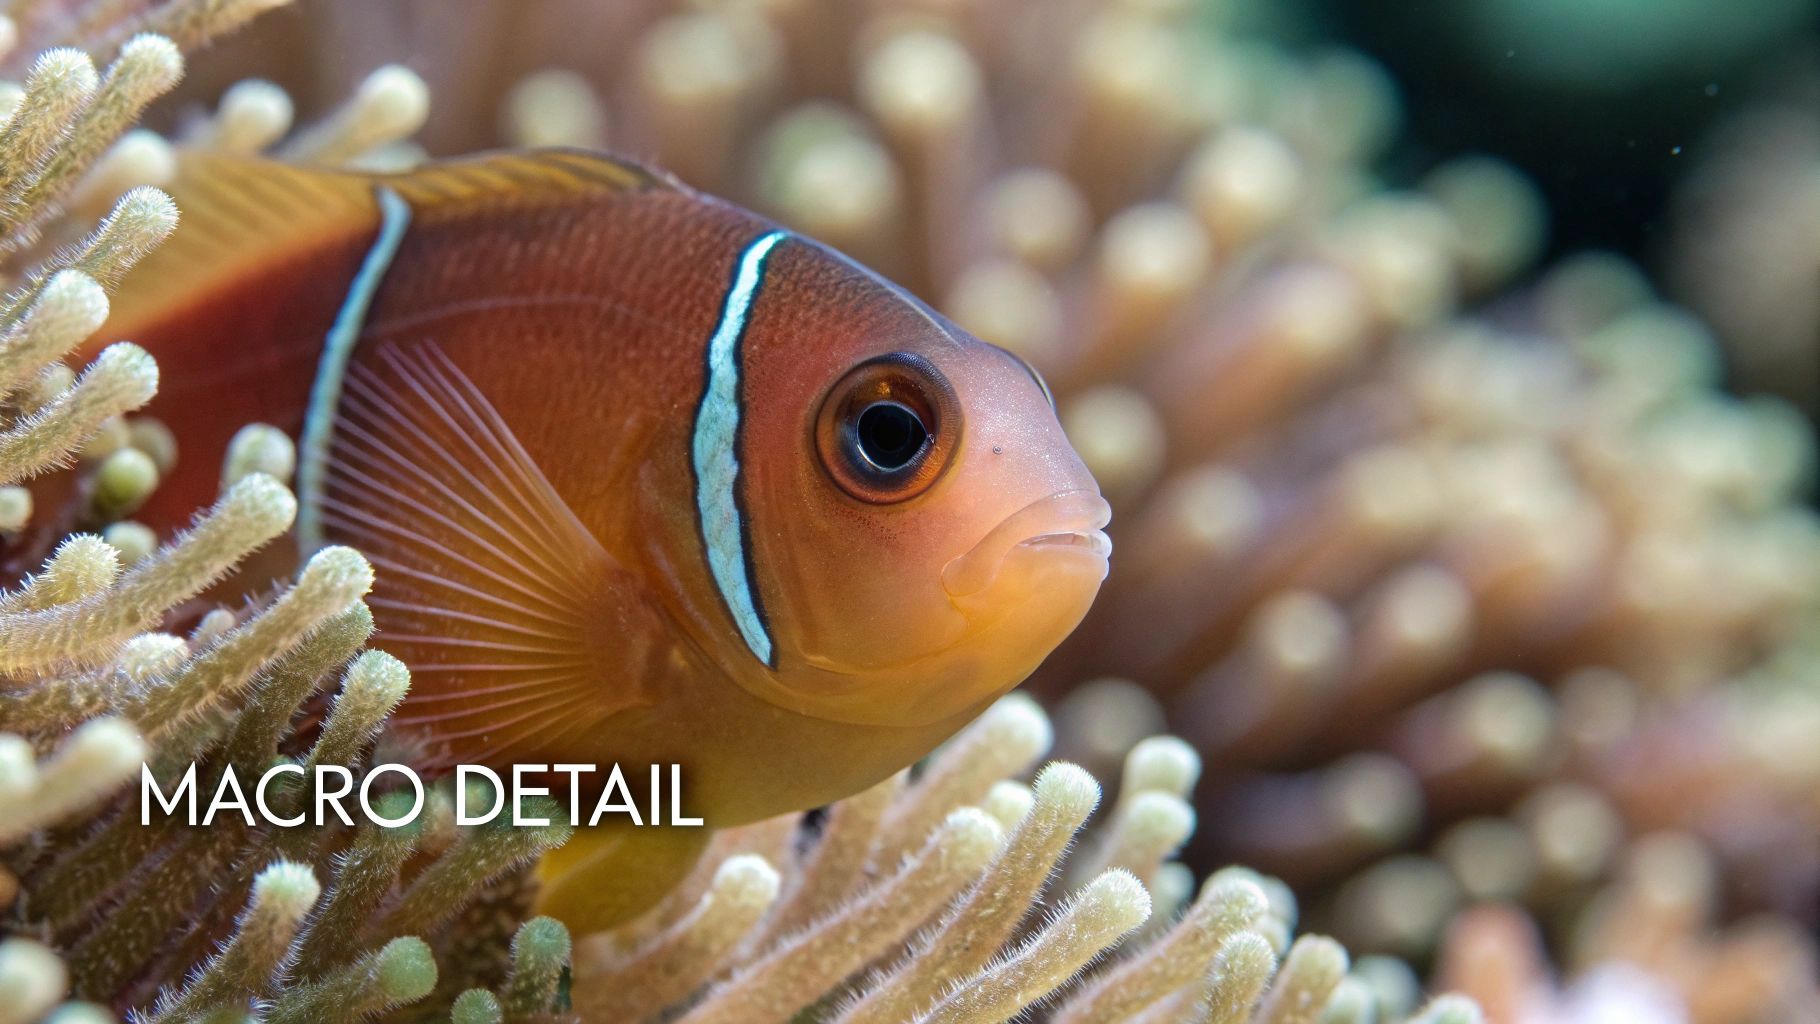
6. Macro Snorkeling Photography Techniques
Macro snorkeling photography offers a unique perspective on the underwater world, revealing intricate details often missed by the casual observer. Instead of capturing sweeping reef scenes, macro photography focuses on extreme close-ups of tiny subjects, magnifying them to life-size or even larger. This technique transforms small marine creatures, coral polyps, and textures into dramatic, frame-filling subjects, offering exciting photographic opportunities even in shallow, easily accessible snorkeling locations.
How it Works:
Macro photography relies on specialized equipment and techniques to achieve extreme magnification. This typically involves using macro lenses or add-on wet lenses (diopters) that attach to your existing underwater housing. These lenses allow you to focus extremely close to your subject, creating images where tiny creatures appear larger than life. The goal is to achieve a 1:1 reproduction ratio or greater, meaning the image sensor captures the subject at its actual size or even bigger.
Examples of Successful Macro Snorkeling Photography:
- Detailed portraits of small reef fish: Capture the intricate scale patterns, vibrant eye colors, and delicate fin details of juvenile fish or smaller species.
- Coral polyp close-ups: Reveal the complex structure of individual coral polyps, especially when extended for feeding, showcasing their vibrant colors and textures.
- Nudibranch portraits: Highlight the dazzling array of colors, patterns, and textures found on these fascinating sea slugs.
- Behavioral shots of tiny reef creatures: Capture the intriguing behaviors of blennies peering out of their burrows, gobies interacting with their surroundings, or shrimp cleaning larger fish.
Tips for Macro Snorkeling Photography:
- Stabilization is Key: Use proper floating techniques to minimize camera shake. Consider a small, flexible tripod if conditions allow.
- Focusing: Auto-focus can be helpful for initial acquisition, but switch to manual focus for precise fine-tuning, especially given the extremely narrow depth of field.
- Aperture: Use smaller apertures (f/16-f/22) to maximize depth of field, ensuring more of your subject is in focus.
- Shutter Speed: Use the highest shutter speed possible to freeze the motion of both your subject and any slight camera movement.
- Magnification: Add wet macro lenses (diopters) to your standard underwater setup for increased magnification. Experiment with different strengths to find the ideal magnification for your subjects.
- Practice Makes Perfect: Start practicing in shallow, calm, and protected areas before attempting macro photography in more challenging conditions. This will help you develop your technique and familiarize yourself with your equipment.
- Lighting: In many cases, you'll need additional lighting (strobes or a focus light) to properly illuminate your subject, especially at smaller apertures.
Pros and Cons of Macro Snorkeling Photography:
Pros:
- Reveals extraordinary details invisible to the naked eye.
- Works well in conditions less ideal for wide-angle photography (e.g., less clear water, smaller reef areas).
- Can be highly productive even in limited reef areas.
- Less affected by water clarity issues than wide-angle photography.
Cons:
- Extremely narrow depth of field requires precise focusing.
- Camera and subject movement are magnified, increasing the risk of blur.
- Often requires additional lighting equipment for proper exposure.
- Limited to very small areas and subjects.
Why Macro Photography Deserves a Place on This List:
Macro photography offers a completely different way to experience and document the underwater world while snorkeling. Even in locations frequented by party boats and snorkeling tours, macro photography opens up a world of hidden beauty that’s easily accessible with the right equipment and techniques. It’s a fantastic option for those looking to capture unique and compelling images, especially when conditions aren't ideal for wide-angle photography. It allows snorkelers to engage with the marine environment on a deeper level, fostering appreciation for the smaller, often overlooked inhabitants of the reef.
7. Post-Processing for Underwater Color Correction
Underwater photography presents a unique challenge: water acts as a filter, absorbing colors at different depths. Red disappears first, followed by orange, yellow, and green, leaving your photos with a heavy blue or cyan tint. This is why post-processing is a crucial step for any snorkeling photographer, especially those capturing the vibrant reefs around locations like Punta Cana and Bavaro. Post-processing allows you to correct this color distortion and restore the natural beauty of the underwater world.
How it Works:
Post-processing software uses various tools to manipulate the color and contrast in your underwater images. This involves adjusting white balance, color temperature, tint, and saturation. Specialized tools like HSL (Hue, Saturation, Luminance) adjustments allow you to fine-tune individual color ranges, adding back the reds and oranges absorbed by the water. Clarity and dehaze tools can help compensate for the loss of contrast caused by suspended particles.
Examples:
Imagine snorkeling in Punta Cana, encountering a stunning reef full of life. Your raw photos, however, might show a flat, blue-dominated scene. Post-processing can transform this image:
- Restoring Color: That seemingly dull coral, actually a vibrant red or orange, can have its true colors restored. Similarly, the bright yellows and purples of reef fish can be brought back to life.
- Enhancing Contrast: The subtle patterns on a fish or the delicate texture of a sponge can be enhanced through contrast adjustments, making details pop.
- Balancing Split-Shots: If you're capturing half-in, half-out (split-shot) photos from the surface, post-processing allows you to balance the exposure and colors between the above-water and underwater portions of the image.
Tips for Snorkeling Photographers:
- Shoot in RAW: RAW format preserves significantly more image data than JPEG, providing much greater flexibility during post-processing.
- White Balance: Use the white balance selector tool on a neutral gray or white area in your image (a dive slate works well). If no neutral area is available, experiment with underwater white balance presets.
- HSL Adjustments: Don't just warm the entire image; use HSL adjustments to specifically target and boost the reds and oranges.
- Graduated Filters: Mimic the natural light falloff underwater by using graduated filters to adjust the color and exposure of deeper areas separately from shallow areas.
- Clarity and Dehaze: Use these tools cautiously. Overdoing it can lead to an artificial look.
- Custom Presets: Create your own presets for different depths and water conditions encountered during your snorkeling tours. This will drastically speed up your workflow.
- Backscatter Removal: Use cloning or healing tools to remove distracting backscatter – those small white specks caused by suspended particles in the water.
Pros:
- Dramatic Improvement: Post-processing significantly enhances the visual impact of underwater photos, revealing the true colors and details of the marine environment.
- Compensation for Conditions: It can partially compensate for less-than-ideal shooting conditions, like cloudy days or deeper dives.
- Creative Control: It allows for creative interpretation of underwater scenes.
Cons:
- Limitations: It can't fully restore color lost in very poor lighting.
- Learning Curve: It requires learning new software and techniques.
- Time Commitment: Post-processing can be time-consuming, especially for large batches of photos.
- Artificial Look: Over-processing can lead to unnatural-looking images.
Popular Tools and Resources:
- Adobe Lightroom: Offers powerful editing tools and underwater photography presets.
- Vivid-Pix: Specialized software designed for underwater photo correction.
- Backscatter.com: Provides tutorials focused on underwater photo editing.
Post-processing is essential for any serious snorkeling photographer looking to capture the vibrant colors of the underwater world. It allows you to share your experiences in Punta Cana, Bavaro, or any other snorkeling destination with the vibrancy and detail they deserve. By understanding the techniques and dedicating some time to editing, you can transform your underwater snapshots into stunning images that truly showcase the beauty of the reefs and marine life.
7-Point Comparison: Snorkeling Photography Tips
| Technique | 🔄 Complexity | 💡 Resources | 📊 Expected Outcomes | Ideal Use Cases | ⭐ Key Advantages |
|---|---|---|---|---|---|
| The Rule of Thirds for Underwater Composition | Low | Minimal (grid lines required) | Balanced, professional compositions | Reef scenes, split shots, general underwater work | Dynamic, visually appealing imagery |
| Mastering Natural Light for Shallow Water Photography | Moderate | Natural light; no extra lighting gear | Vibrant, naturally lit images | Daylight snorkeling, shallow water shoots | Authentic colors with minimal equipment |
| Wide-Angle Split-Shot (Over-Under) Technique | High | Specialized gear (dome port, wide-angle lens) | Dramatic, dual-perspective images | Scenic locations with calm water surfaces | Complete environmental storytelling |
| Close-Focus Wide-Angle Technique | Moderate-High | Wide-angle lens with close-focus capability, mini dome port | Immersive, detailed compositions | Intimate marine life close-ups | Enhanced clarity and immersive depth |
| Ambient Light Silhouette Photography | Moderate | Natural sunlight; minimal gear needed | Striking, high-contrast silhouettes | Upward shooting, artistic underwater portraits | Bold, dramatic imagery |
| Macro Snorkeling Photography Techniques | High | Macro lenses/attachments, extra lighting | Extreme close-ups with intricate details | Small subjects and detailed textures | Reveals details invisible to the naked eye |
| Post-Processing for Underwater Color Correction | Moderate-High | Editing software (e.g., Lightroom), RAW files | Vibrant, balanced, high-impact images | Correcting color casts & enhancing contrast | Dramatically improves visual impact and color fidelity |
Capture Your Underwater Adventures
From mastering the Rule of Thirds for breathtaking underwater compositions to harnessing the power of natural light and exploring advanced techniques like split shots and silhouettes, these seven snorkeling photography tips will transform your underwater snapshots into stunning works of art. Remember, the key takeaways are practice, experimentation, and respect for the marine environment. By honing these skills, you'll not only capture incredible images but also deepen your appreciation for the delicate beauty of our oceans. If you're planning on snorkeling with manta rays, check out these helpful tips for a safe and memorable manta ray night snorkel from Manta Ray Night Snorkel Kona Hawaii Tours.
Imagine sharing your vibrant photos from your next snorkeling adventure, inspiring others to explore the wonders beneath the surface. Ready to elevate your snorkeling photography game and create unforgettable memories? Book your next adventure with Pod Paradise RD and put these tips into action! Pod Paradise RD offers incredible snorkeling excursions in Punta Cana, providing the perfect backdrop for capturing stunning underwater photography.
Article created using Outrank